Showing posts with label Eyeshadow. Show all posts

Tuesday, March 28, 2017

The One Smokey Eyeshadow Pencils by Oriflame - Review, Swatches & EOTD

Hello everyone,
I am going to talk about a new launch from Oriflame - The One Smokey Eyeshadow Pencils.These are a new launch this month in the Oriflame India catalogue. If you have read my previous posts you would know that Oriflame is celebrating its 50th global anniversary. I have been using their products even before I got into the blogging world and have been associated as a blogger with Oriflame since 3 years now. I love Oriflame makeup and own most of it, they have some really good products. So I got to try this product and after using them I am here to tell you what I think of them. Please read on to know more...


The One Smokey Eyeshadow Pencils by Oriflame - Review, Swatches & EOTD

Price: Rs.449/- for both. Available at introductory discount of Rs.335/- in March 2017 catalogue.

Ingredients:
ETHYLHEXYL PALMITATE, SILICA, CAPRYLIC/CAPRIC TRIGLYCERIDE, HYDROGENATED POLYCYCLOPENTADIENE, CERA MICROCRISTALLINA, POLYETHYLENE, SYNTHETIC FLUORPHLOGOPITE, POLYETHYLENE TEREPHTHALATE, DICALCIUM PHOSPHATE, CAPRYLYL GLYCOL, TRIETHOXYCAPRYLYLSILANE, TOCOPHERYL ACETATE, ETHYLHEXYLGLYCERIN, POLYURETHANE-11, TIN OXIDE, CI 77499, CI 77891, CI 77000, CI 77492

About the product:

Create smokey effects with soft, deep shades. Creamy formula with shimmering, light reflecting pearls that glides on easily with the retractable pencil. Smudge, blend, and shadow to create the enticing look that everyone wants.

Packaging:
Both the eyeshadow pencils come in a jumbo stick format.Strangely the color of the body looks identical but colors are not same when swatched - they are different. Shade name is mentioned at the bottom so you will have to check that. The really good thing about these pencils is that they come in a twist up version, so no sharpening or product wastage.Yay!! They are travel and user friendly.


The One Smokey Eyeshadow Pencils by Oriflame - Review, Swatches & EOTD
Top to bottom: Glitter Black, Jet Black

The Smokey eyeshadow pencils come in 2 variants:
Jet Black: It is a creamy and deep black color eyeshadow stick. I could not spot shimmer in this one.


Glitter Black: This pencil looks more of a greyish black to me and is my favourite among the two. It has glitter which I like to be honest and will look great on you if you are attending an evening party or function.


The One Smokey Eyeshadow Pencils by Oriflame - Review, Swatches & EOTD

The pencils are creamy and glide smoothly on the eyelids.The pigmentation is good and it easily spreads on the eyelids.If you are a makeup enthusiast you would know smokey eyes have been in trend ever since. I love smokey eyes too and generally use any pencil I may have to achieve it. I don't own any good quality ones yet so this is my first ever experience.


The One Smokey Eyeshadow Pencils by Oriflame - Review, Swatches & EOTD

The One Smokey Eyeshadow Pencils by Oriflame - Review, Swatches & EOTD

So coming to the pencil, they glide on smoothly on the eyelids.They are creamy and can be easily blended and smoked out. Now I do have hooded/folded eyelids and hence any product easily creases and this one did too but these ones are great lasting wise. I have used other pencils like these from different brands and they were horrible in my opinion. This one seems much better and I would suggest using a translucent loose powder to set it or use a black/grey eyeshadow whichever is applicable over it to set it.Overall I love these smokey eyeshadow pencils and would recommend them to those who love doing smokey eyes.I haven't shared a picture of me wearing it on my eyes, will try and do so on my Snapchat and Instagram soon make sure you follow me there ☺☺

MLWM Rating: 4.3 /5

I hope this review was useful and helpful to all those reading. Please leave your comments and suggestions below, would love to hear from all of you!!

Until next time... Take care xoxo


Monday, August 13, 2012

MAC Moth Brown Eyeshadow Review, Photos, Swatches!

mac moth brown eyeshadow

MAC Moth Brown Eyeshadow

MAC Moth Brown Eyeshdow ($15) is a beautiful metallic charcoal-taupe with a tinge of purple. Moth Brown was re-released in the MAC By Request Collection as it was a highly popular choice among voters. If you were hoping for a brown, you might be disappointed because Moth Brown most definitely isn't brown. From the looks of it, it looks similar to the ever-popular MAC Satin Taupe, but when swatched, Satin Taupe is much warmer and has more brown tones, whereas MAC Moth Brown is cool toned with more gray tones.

It's a really pretty shade and shines differently in all angles. It's a shade that will work well with all eye colors and skin tones and is subtle enough to be worn all over the lid for daily wear or amped up for a night time smokey eye.

The consistency is very smooth like a typical MAC Frost finish eyeshadow, easy to blend and has opaque pigmentation.

A must-have? It's definitely nice to have especially if you gravitate towards taupe shades, but don't kick yourself if you missed out on it.

mac moth brown eyeshadow

mac moth brown eyeshadow

mac moth brown eyeshadow

mac moth brown eyeshadow

mac moth brown eyeshadow

Do you own Moth Brown? Do you think it lives up to the hype? 

Wednesday, July 18, 2012

Bobbi Brown Burnt Sugar Eyeshadow Review, Eye Look, Photos and Swatches!

Bobbi Brown Burnt Sugar Eyeshadow Review

Bobbi Brown Burnt Sugar Eyeshadow

Bobbi Brown Burnt Sugar Metallic Eyeshadow ($21) is described as a deep, golden brown. Although I would categorize it as more of a medium, golden brown as it's not dark at all on the lids. In the pan, the color looks very neutral - almost like a taupe brown, but on the skin, the golden tones appear. It's not really a yellow/orange golden, it's rather a bronze.

Although it's not all that unique, I don't own any exact dupes. The closest matches are MAC Tempting and Urban Decay Smog, but both are slightly deeper and warmer.

I've had this shadow for a couple of years now, and reach for it every now and then for a quick eye look. I'm all about simplicity when it comes to my everyday eye makeup, and I love shades that work well solo and give off the "illusion" that I'm wearing more than one shadow, and that it took me more than 30 seconds to complete the look. Burnt Sugar is one of those shades that you can wipe across your lids, apply a little mascara and be done with it. In fact, I don't think I've ever worn this shadow with anything else.

Bobbi Brown Burnt Sugar Review

Bobbi Brown Burnt Sugar Eyeshadow Swatches
Bobbi Brown Burnt Sugar applied (packed heavily) all over the lid, stopping slightly above the crease, and smudged on the lower lashline. Then, used a tapered blending brush to blend out the edges and slightly bring the shadow upward, toward the brows. MAC Nylon Eyeshadow applied to the brow bone and inner corner for a highlight.

I can't say much on Bobbi Brown Eyeshadows as a whole, because I've only tried a couple. I'm not sure if the quality can differ from shade to shade (like MAC - some are softer, more/less pigmented, etc) but I can vouch that Burnt Sugar is very smooth, applies just the same, and is super pigmented.

Bobbi Brown Burnt Sugar Eyeshadow

Bobbi Brown Burnt Sugar Eyeshadow Swatches

Bobbi Brown Burnt Sugar Eyeshadow Swatch

Bobbi Brown Burnt Sugar Swatches

bobbi brown burnt sugar swatches
A heavy and light swatch of Bobbi Brown Burnt Sugar

With many of Bobbi Brown's products, you don't exactly get a lot of bang for your buck. $21 might seem like a lot for an eyeshadow, but if you look at how much product you're getting (0.10 oz), you're getting exactly double the amount of product as a MAC eyeshadow (0.05 oz, $15) and Urban Decay (0.05 oz, $18) as well as many other brands. Nars Eyeshadow contains 0.07 oz of product for $24.

The Round-Up

Pros:
  • Gorgeous shade for the brown lovers out there
  • Isn't overly warm, so those with cooler skin tones can enjoy Burnt Sugar as well
  • Soft texture
  • Easy to blend
  • Pigmented - easy to build from sheer to opaque (for the fullest coverage, try using a primer)
  • Great value
  • Functional packaging - small, slim and lightweight; ideal for travel
Cons:
  • None!
Price: $21, Bobbi Brown, Sephora or your local Bobbi Brown counter.

Sunday, July 8, 2012

Green and Brown Cut Crease Eyeshadow Tutorial!


Green is actually one of my favorite colors, but I normally shy away from colored eye shadow. I've been wanting to do a look with green eye shadow, so this morning I decided to mess around a little bit with some green and snap some photos during the process.

Green looks great paired with almost every color. It's a earthy color, so it looks great paired with warm autumn shades (brown, gold, burgundy, orange, etc.) and it also works well paired with bright, floral shades (pink, purple, blue, etc.) You all know that I love my neutral and warm shades - so my favorite pairing is brown and gold.

I actually don't own very many green eye shadows - in fact, I got rid of most of them a while ago because they started collecting dust in my drawers (well, not exactly, but you know what I mean.) I would've loved to use an olive green for this look - I've had MAC Sumptuous Olive on my "to buy at some point" list for ages, so I'm definitely going to add it to the top of my shopping list.

Anyways, enough babbling..


Products Used:
Maybelline Bold Gold Color Tattoo Cream Eyeshadow (used in Step 1)
YSL Absinthe Green 4-Colour Harmony for the Eyes (used in Step 2)
MAC Retrospeck Eyeshadow (used in Step 3)
MAC Tempting Eyeshadow (used in Step 4)
MAC Brun Eyeshadow (used in Step 5 and 7)
Urban Decay Half Baked Eyeshadow (used in Step 8)
Physician's Formula 2-in-1 Lash Boosting Brown Eyeliner (used in Step 9)
Elizabeth Arden Caramide Mascara (review soon!) (used in Step 10)
Ardell #116 False Lashes (used in Step 11)

Brushes Used:
Sponge Applicators (used in Step 1, 2 and 3)
Sigma E30 Pencil Brush (used in Step 4)
Small Generic Shader Brush (used in Step 5)
Sigma E65 Small Angle Synthetic Brush (used in Step 7 & 8)

*A non-shimmery base would've worked better for this tutorial - I used gold to warm up the green, but this base in particular made the otherwise smooth, pigmented green appear patchy.

*A thinner line with a matte, cream eyeliner would've worked better for this tutorial (I made it too thick, and it was pretty much irreversible!)

*When using tape, make sure to press the tape on the back of your hand a couple of times before applying it to your face. You don't want it to be very sticky, because you don't want the tape pulling your skin when you remove it.


Hope you all have a wonderful end to your weekends!

Talk to you tomorrow! :)

Tuesday, June 26, 2012

Step by Step Smokey Taupe Eyeshadow Tutorial!

mac eyeshadow tutorial

Smokey Taupe Eyeshadow Tutorial

One of my favorite eyeshadows is MAC Satin Taupe. It's a really pretty frosty taupe (gray brown) that looks great with a variety of looks. It looks amazing paired with brown and burgundy - One of my favorite ways of wearing it is by applying a dark brown base to my lids and layering Satin Taupe over top, to intensify and slightly deepen the color, then apply a soft golden brown through the crease, and a reddened brown through the outer-v. The burgundy mixed with the taupe almost gives off a slightly mauve/plum tone that really brings out the green in my eyes. 

I'll be doing just that in this tutorial, but I'm making the look a bit more dramatic by adding black eyeshadow and liner. 

To make this look more daytime appropriate: The black shadow, liner and faux lashes are what really intensify this look, so for something a little lighter and more wearable during the day, skip step 7, 9, 10 and 12. You really don't have to line your eyes at all (I wear this look often during the day without liner), but if you'd really like to, you can opt for a dark brown liner for the top lash line.


Products Used:
Nars Smudeproof Eyeshadow Base (used in step 1)
MAC Constructivist Paint Pot (used in step 2 and 3)
MAC Satin Taupe Eyeshadow (used in step 4)
MAC Soba Eyeshadow (used in step 5)
MAC Handwritten Eyeshadow (used in step 6)
MAC Carbon Eyeshadow (used in step 7)
MAC Crystal Avalanche and Nylon Eyeshadows (used in step 8)
MAC Retrospeck Eyeshadow (used in step 8)
YSL Eyeliner Effect Deep Black Faux Cils Cream Liner (used in step 9)
Covergirl Lash Blast Mascara (used in step 11)
KKCenterHK False Lashes #ES A562 (used in step 12)
Lorac 3-in-1 Waterproof Eyeliner Pencil (used to line my waterline afterward - for reference, I would not recommend this liner)


Brushes Used:
Generic Concealer Brush (used in step 2, 3 and 4)
ELF Studio Contour Brush (used in step 5)
MAC 219 Pencil Brush (used in step 6, 7 & 8; cleaned & used for the inner corner only. I used my fingertip for the brow bone highlight)
Coastal Scents Synthetic Fine Liner Brush (used in step 9)
Coastal Scents Small Detail Brush (used in step 10, to drag the liner upward and smudge)

Misc:
MAC Quite Natural Paint Pot was used to fill in my brows


I hope you enjoyed this tutorial!

*For swatches of the individual eyeshadow shades, check out my recent 'My MAC Everyday Palette' post.

Monday, June 25, 2012

MAC Paint Pots Overall Review with Swatches and Photos! (pic heavy)

mac paint pot reviews

MAC Paint Pot Overview

MAC Paint Pots ($17.50) are MAC's take on Cream Eyeshadows. They are versatile products because there can be several uses for them. You can wear them alone on the lids, as a liner, as a primer or as a base color for powder eyeshadow/pigments.

A highly pigmented eye colour that goes on creamy but dries to an intense, vibrant finish. Long-wearing, colourfast. Creates seamless coverage without weight or caking. Blends smoothly over the lids. Cream-based, can be mixed with M·A·C shadows and liners.

MAC Paint Pots are available in nine shades: Bare Study, Soft Ocher, Painterly, Rubenesque, Indianwood, Groundwork, Constructivist, Quite Natural and Blackground. I own all of them, except Blackground and Soft Ocher. (None of which I have posted reviews for in the past, so I thought it'd be a good idea to gather them up and review them together.)

MAC releases limited edition shades every now and then in some of their collections, but the actual permanent collection is quite small and lacks much color. All of the colors are fairly neutral. MAC did have many more colors in the past, but almost all of them became discontinued and they never filled the void with replacement/additional shades.

mac paint pot reviews

mac paint pot reviews

Continue reading for individual reviews and swatches

mac paint pot swatch

Rubenesque - Golden peach with gold pearl (frost)
Rubenesque is very sheer, and has to be layered for opaque coverage. Because of it's sheerness, I never wear it alone. I usually wear it as a base for when I'm wearing warm-toned eyeshadows such as orange, peach, gold, copper, bronze, melon pigment, etc, or sheer, natural shadows (sheer gold, sheer champagne, sheer ivory, etc.)
Consistency: Very smooth and blends easily.
mac rubenesque paint pot
Perky (Limited Edition, Fafi Collection '08) - Warm pinky-peach with white pearl (satin)
Perky has good color pay-off and gives a soft wash of warm, vibrant pink to the lids. I personally don't look that good with it worn solo on my eyes, so I usually use it as a base under any pink toned eyeshadows. It's not one I reach for very often.
Consistency: Very smooth and blends easily.
mac perky paint pot

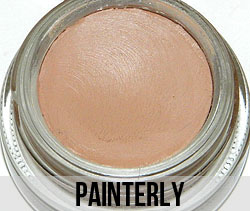
Painterly - Nude Beige Cream (cream)
Painterly is a neutral, matte pink-beige. It has good color pay-off and works as a perfect base for neutral eyeshadow looks. It's a pretty versatile paint pot because it's such a natural shade, it blanks out your lid, making it a smooth, even canvas for your eyeshadow to stick to. 
Consistency: Smooth, creamy and blends easily.
mac painterly paint pot

Bare Study - Soft Beige with gold pearl (frost)
Bare Study is another versatile paint pot that can work with a variety of looks. It's sheer and frosty, and although it doesn't add much to the lids when worn alone, it works as a great base for every color of eyeshadow with any finish. Because of it's light, frosty color, it makes eyeshadows used on top of it stand out a bit more. For a natural look, it looks great applied all over the lid with a soft brown in the crease, and a little bit of liner and mascara. It also works good for a brow highlight. 
Consistency: Smooth and blends easily.
mac bare study paint pot

Indianwood - Metallic antique brown (frost)
Indianwood is a pigmented deep, metallic gold. It's one of my favorite paint pots because it looks pretty on it's own, or combined with other warm eyeshadows. I use it as a base often with shades like MAC Woodwinked, MAC Bronze, Urban Decay Half Baked, etc to intensify the gold. It also looks great when applied over the lids with a light dusting of shimmery pigment on top!
Consistency: Exceptionally smooth, easy to work with, blends easily. 
mac indianwood paint pot

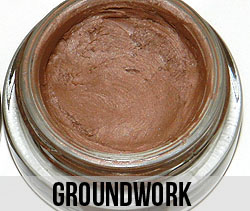
Groundwork - Mid-tone neutral taupe (satin)
Groundwork is a shade that is suitable for every skin tone for a light wash of ash brown to the lids. It has good color pay-off, and can be layered for full opacity. It's a great shade for medium brown smokey eyes and neutral eyeshadow looks. I often use it alone on my lids with a little eyeliner, mascara and a brow/tear-duct highlight when I'm in a rush or softly blend it across my top and bottom lash-line for a soft, natural effect. Consistency: Smooth and blends easily - drier than Indianwood.
mac groundwork paint pot

Quite Natural - Dirty chocolate brown (cream)
Quite Natural is a warm, medium brown with very good pigmentation. I was a little disappointed at first upon purchasing it, because the consistency is a bit dryer/thicker in comparison to my other paint pots. It's still smooth to the touch, but I find that you have to work with it quickly because it dries in a short amount of time. I love wearing Quite Natural all over my lid, smoked out on the edges and blended in my lower lash-line. It's a very quick, effortless look that is very pretty! It can also be layered for a darker effect. I also use it as a liner (usually smudged, rather than applied precise) and I've even used it on my brows for a filler. Lastly, it works as a great base for dark brown eye looks. 
Consistency: Drier than other paint pots, but still smooth to the touch. Blends easily, but dries quickly, so you must work quickly with it.
mac quite natural paint pot

Constructivist - Metallic brown with red pearl (frost)
Constructivist is another favorite, as I'm a lover of brown, and this is a gorgeous brown! It's an extra-deep mahogany brown with slight shimmer. The uses for this paint pot are very similar (if not the same) uses as Quite Natural. I wear it in the very same way - all over my lid, smoked out on the edges and blended in my lower lash-line for a dark brown, simple smokey eye. The difference between the two is that Constructivist is a shade or two darker and on the eyes it's noticeably not as warm as Quite Natural. I also wear it layered under other brown eyeshadows when I want a dark eye. 
Consistency: Exceptionally smooth, easy to work with.
mac constructivist paint pot

Favorites
Constructivist is definitely a favorite, as is Indianwood and Quite Natural (despite the texture). For the lighter shades, I'd pick Rubenesque as it's the easiest to work with and it's a great base for all of the warm colored eyeshadows I normally wear.

Application
I usually use my finger to apply Paint pots because I can pick up a good amount of product with my fingers, and my body warmth will soften the product, making it easy to blend on the lids. It's also easy to blend out harsh edges with the fingertips. In terms of brushes, I find a flat synthetic brush works the best (often times I use a lip brush or small concealer brush) especially with the drier texture paint pots, such as Quite Natural. Fluffy brushes don't pick the product up well, but they can work good to blend out rough edges.

Packaging
MAC Paint Pots are housed in clear, heavy glass jars with a black rubberized screw-top lid. It's the exact same packaging for their Studio Sculpt Concealer, and a bit smaller than their Fluidlines. They aren't the most ideal for travel because they are a bit heavy, and you have to be careful not to drop them on ceramic tile, concrete, etc, because the glass can chip. (It's never happened to me, but I've shattered many jars of Studio Fix Fluid over the years!)

Because these are cream products, you have to make sure to close the lid tightly each time after use, because they can become dry. If you have any issues with drying out, I've read that some like to pop the jar in the microwave for 10 seconds or so to soften it up again - I've tried it with Groundwork in the past, and it worked well.


Swatches:
mac paint pot swatches
Swatches from left to right: Bare Study, Painterly, Rubenesque, Indianwood, Perky, Groundwork, Quite Natural and Constructivist. (Indoors, without flash)

mac paint pot swatches
(Indoors with flash)

I guess you can say that I'm a pretty big fan of MAC Paint Pots. I've used other products - MAC Shadesticks (discontinued), MAC Paint, NYX Jumbo Eye Pencils, etc - and although they might be more convenient to use, I prefer Paint Pots. I do like MAC Paint though for records, I have Bare Canvas and Bamboon and they work really well - just loathe the packaging!

If you haven't tried them yet, I definitely recommend trying one out at some point! I never thought I was going to like them. In fact, I thought they were an overrated product until I purchased my first one!

The Round-Up

Pros:
  • Although the color selection is small, the shades available are very pretty
  • Creamy consistency (the frost finishes tend to be smoother)
  • Easy to use
  • Work great as a base or alone
  • Long-lasting (the cream/satin finishes tend to last longer without fading)
  • Good Value - one jar will last a very, very long time with daily use. Especially the darker, pigmented colors. 
Cons:
  • Small color selection - all neutral or brown shades. Lacking a white shade (which is great for any eyeshadow - esp. colors and brights) and colors. It makes me wonder if they will discontinue the line all together. 
  • Isn't very sanitary, considering if you use your finger each time and putting the product on your eyes. Taking a little product out with a brush or spatula would be your best bet, otherwise, make sure your hands are clean!
  • Heavy packaging - isn't ideal for travel
Price: $17.50, MAC.

What's your opinion on MAC Paint Pots?