Friday, March 30, 2012

Illamasqua Mislead Eye Liner Cake Review, Photos and Swatches!

illamasqua Mislead Eyeliner Cake Review

Illamasqua Eye Liner Cake in Mislead

Have you ever heard of "cake liner" before? The first time I ever heard of it was several years ago when I became interested in learning more about theatrical makeup (Ben Nye, Graftobian, Cinema Secrets, etc) and came across Ben Nye Cake Eyeliner - well, I never got around to trying it, but it's a product that's always sat in the back of my memory of products to try one day.

Cake Eyeliner is pretty much the only type of liner I haven't tried before. I've for the most part tried all of the liner options out there - pencil, cream, gel, liquid, kajal, powder, you name it. My preferred choices on most days are gel and liquid.

When I stumbled across Illamasqua Eye Liner Cake ($23), I decided I had to try it, despite there not being too many reviews out there.

Illamasqua Eye Liner Cake is a pressed powder formula, that when comes in contact with water/liquid, becomes an intense liquid-liner.  

There are three (3) colors in total: Mislead (black), Zeal (pine green) and Danger (navy). I chose Mislead, because one could never own enough black liners, right? haha

You can use water to mix the product with, but when using water, I notice the color isn't as vibrant and the lasting power isn't as good. There are of course other options in order for it to last longer - such as MAC Fix Spray, Illamasqua Sealing Gel, Benefit SheLaq, Visine, etc. I usually use Visine and it works great.

illamasqua mislead

I usually pour a couple drops of Visine on a clean palette, wet the tip of my application brush (usually a thin eyeliner brush or angled brush) and run the brush a few times over the powder to get a good amount of product on the brush. Then, apply it to the lash-line. It does dry fairly quick, so I like to make sure my brush is pretty damp to avoid going back and forth to apply more liquid and product mid-application.

If you aren't satisfied with your line, or if you'd like to deepen you line, you can go over the area again. The liner will dry to a matte finish, and it will not budge.

If you have oily eyelids, I'd highly suggest priming your lids and applying an eyeshadow for a base. On days where I don't want to wear shadow, I'll still prime my lids and apply a matte, flesh-tone eyeshadow, such as MAC Brule as a base and the liner won't budge.

Because this product activates when it comes in contact with water/liquid, it will budge if you come in contact with wetness. I wouldn't recommend wearing this liner on grueling hot days or with vigorous exercise, as sweat will make the liner wear off a bit.

I'd like to mention that this product is meant to use wet.  There is absolutely no color payoff when attempting to use it dry. It's not like a typical pigmented eyeshadow that can be used wet or dry for those hoping that you can use this product as a black eyeshadow.

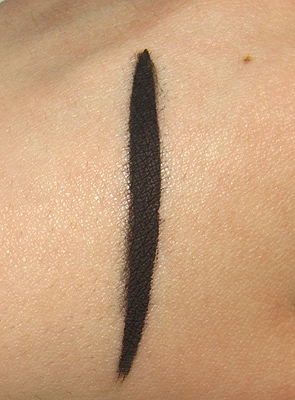
Here is the liner swatched on my hand using Visine as my mixing agent.
illamasqua mislead swatch

And, here it is applied to my primed eyelids.
Illasmasqua Mislead Eyeliner

Illamasqua Mislead Eyeliner on eyes

Like I already mentioned, when the liner dries, it's not going to budge, so if you want more of a "smokey" or smudged look, I'd recommend using a small smudge brush for application and try not to saturate the brush in liquid and product for a slightly drier application. It works pretty well.
illamasqua eyeliner cake on eyes
I often like having a very deep, smudged, matte black line, but steer away from black shadows because they can get very messy (MAC Carbon is the King of fall-out). This product gives me exactly what I want.

I also really like the compact, and the fact that it has a mirror, and knowing that the product will never dry out! You can literally use this stuff to the very end. 

I haven't used the product enough to really state if it's a must-have product for me, but I will continue using it and update you all of my overall thoughts about the product. So far, I'm really liking it.

Price: $23, Sephora.

Have you ever used cake liner? Let me know your thoughts in the comments!

Wednesday, March 28, 2012

The PMD Personal Microderm Microdermabrasion System.

PMD Personal Microderm Microdermabrasion System

I have what you call "high maintenance skin". My skin isn't in very bad shape overall - actually, I have pretty good genes, but as soon as I start skipping my skincare routine, my skin goes haywire. When I stick by a daily regime, my skin looks in tiptop shape - but it's pretty rare that I actually stick by a routine for more than a couple weeks at a time. Why? 'Cuz it's so much easier to just wipe my face with a makeup remover towelette and go to bed. Yes, laziness is the key word here.

Once upon a time I did have some blemish scars, but they soon faded after using an exfoliating brush regularly, along with creams containing alpha hydroxy and glycolic acid.

Right now, my main gripe with my skin is basically the sunspots I have on my upper cheeks from not wearing adequate sunscreen. I never really had freckles until I started exfoliating. I knew your skin becomes more susceptible to sun damage when you're exfoliating and exposing fresh skin to the sunlight, but after seeing first hand all of the speckles on my face, now I know for sure - SUNSCREEN IS KEY!

The PMD Personal Microdermabrasion System is an at-home, handheld device used to exfoliate your skin, not by an exfoliating brush (like the Clarisonic or similar products) but with actual aluminum oxide crystals, like used on expensive machines you'd find in your doctor's office.

What is the purpose of Microdermabrasion? Microdermabrasion is a mild exfoliation of the skins surface, to remove dead skin cells and uncover the fresh and radiant skin cells that lies beneath. Your skin naturally lets go of the dead skin cells on your body, but exfoliation speeds up the process. Doing so, skincare products will better absorb into your skin, working more efficiently. With time you'll notice your skin feels softer, looks smoother, your pores are less visible and scars and spots will diminish.

The machine is very simple to use. It comes with an instructional CD, which is very helpful and should answer all of your questions prior to use. Despite how anxious I was to try it out, I watched the full video twice to make sure I understood it correctly.

READ MORE!

The system includes six (6) exfoliating disks - two green disks (medium grit, for less sensitive skin) and four blue disks with finer grit for sensitive skin, and first time users. The larger disks can be used on the neck and body and the smaller disks should be used on the face.


I've used the system around 4-5 times in total, and each time I've used the blue (sensitive) disk.

What I've learned is that you shouldn't hover over one area too long, and you shouldn't go over any area twice before knowing your skins sensitivity. I mistakenly went over a couple areas twice and hovered too long in the corners of my nose (because I really wanted to make sure the area would get rid of all of the dead skin I had built up) and after about 10 minutes or so, the area became red and irritated. I also had streaks on my one cheek where I went over a couple areas twice. The streaks went away in a couple of days, but my skin around my nose was left very dry and scabbed for a week. 

I was a little nervous at first that it will hurt, but I didn't find it to cause any discomfort. You may feel a little discomfort if you hold it in an area too long - which you aren't suppose to, but when I held it for too long in the area around my nose it felt like sandpaper. I personally barely feel anything - just the suction of the vacuum-like head and a slight grit.

Your face may be a little red/pink after use, and it's completely normal. I usually apply a little aloe vera on my face after use to sooth my skin.

When rubbing your hand across your face, you may also notice white dust. It's the actual shedding of your skin. Pretty cool!

I haven't had any problems since the first time using this, and always make sure to only go over each area once.


I can definitely notice the difference in the texture and overall appearance of my skin after using the PMD. My skin really does feel so much softer, and my overall complexion looks clear and radiant.

My pores also are much less noticeable, especially on my chin. My chin is one area of my face that always has enlarged pores, no matter how many masks, scrubs, etc, I use. The PMD actually minimizes the appearance of them better than anything I've ever tried - just after one use.


I haven't used this tool on my body yet, but I've used it on George's elbows to rid the build up of dead skin, and it almost completely erased the dull & ashy dry skin in one use.

If you have scars on your body, this would be a good tool to use to help lighten them.

It's pretty safe to say that I love this machine and I look forward each week to using it. It's a product that will remain in my skincare routine and I'd definitely recommend it as an at-home alternative to professional microdermabrasions.

Replacement disks can be purchased from the PMD website for $14.95 (set of 6). Each disk should last though 3-4 treatments, and mine actually is still looking good after four uses. A set of six should last six months. 

Price: $179.00, Personalmicroderm.com.

Tuesday, March 27, 2012

Milani Sweet Rose Minerals Blush Review!

Milani Sweet Rose Minerals Blush

I recently picked up three of the four Milani Minerals Blushes once they were marked clearance (75% off) at CVS. (View the post here, with swatches) Well, a couple of weeks ago, I walked into another CVS and noticed they still had several of the clearance products without clearance tags. So, I scanned them, and sure enough they were 75% off. I grabbed a couple of powders, a bronzer and the only blush I didn't purchase prior; Sweet Rose.

Sweet Rose is a dusty plummy-pink with rosy undertones. It's a very natural, every-day kind of color that won't clash with most of your makeup looks. I initially skipped purchasing this blush at first because I figured the purple tone would make me look ashy. But, I was very wrong. You don't see much red in the pan, but once the color hits my cheeks, it mimics the rosy hue my cheeks would turn after a jog.

All of the shades in this range are pretty pigmented, especially Mai-Tai and Sunset Beach, and I expected the same from Sweet Rose, but it's actually a little less pigmented with one tap of the brush. It doesn't lack in pigmentation overall - it does pack a good amount of color, and is very buildable. It's just not one of those blushes you have to be nervous about over-doing.

It's my favorite blush from the range, as I easily favor shades that can be worn the most often.

Milani puts emphasis that this blush is talc-free and non-irritating. So for those sensitive to talc, this may be a range to look into. (For the full ingredient list, scroll down to the end of the review.)

Milani Sweet Rose Minerals Blush

READ MORE!
I'm not too crazy about the packaging - it's a little bulky and I notice with many Milani products, the words printed on the plastic lid fade/chip off shortly after using the product on a regular basis. It does have a mirror, which is wonderful for touch-ups. There is also a brush, which I don't find useful at all. It's too scratchy and doesn't yield even application. Most brushes included in drugstore products don't work well anyway, so I wouldn't hold it against this product.

Here's a quick swatch of the color across my fingers.

And, here's what a light dusting of Sweet Rose looks like on my cheeks. I notice that when I wear this blush without foundation, the color is a little redder/rosier.

I thought it may compare to MAC Blushbaby Powder Blush, but upon closer inspection, Blushbaby is much warmer and ruddy, whereas Sweet Rose is pinker.


I've looked over several reviews for this blush, and it appears to work well for most skintones from light to dark.

I believe Milani is discontinuing this line of blushes, so it may become hard to find with time, but if you do come across this blush on Clearance, and are looking for a natural, rosy blush, this is a pretty good one. I only paid about $2 for this blush, and I'd say it's totally worth it.

Ingredients: Mica, Kaolin, Squakane, Calcium Carbonate, Zinc Stearate, Silica, Magnesium Aluminum Silicate, Sorbitan Isostearate, Sorbitan Stearate, Potassium Sorbate, Lauroyl Lysine, Tourmaline, Malachite Extract. +/- MAY CONTAIN: Titanium Dioxide (CI 77891), Iron Oxides (CI 77491, CI 77492, CI 77499), Ultramarines (CI 77007), Manganese Violet (CI 77742), Bismuth Oxychloride (CI 77163), Ferric Ferrocyanide (CI 77510), Ferric Ammonium Ferrocyanide (CI 77510), Chromium Oxide Greens (CI 77288), Chromium Hydroxide Green (CI 77289), Red 6 (CI 15850), Red 7 Lake (CI 15850), Yellow 5 Lake (CI 19140), Yellow 6 Lake (CI 15985), Blue 1 Lake (CI42090).

Price: Around $2 on Clearance at CVS, but can be found at various online retailers, such as Cherryculture for about $6.

Monday, March 26, 2012

Illamasqua Promise Cream Blusher Review, Photos and Swatches!

illamasqua promise blush

Illamasqua Promise Cream Blusher

Illamasqua Promise Cream Blusher ($24) is described as a "petal pink". It's your average bubblegum cool-pink, that isn't overly cool, so it will definitely work on warm skintones as well as cool, without looking ashy and/or overly cool purple/blue. 

I use to stray away from wearing cool pinks because of my warm skin, but I've started really liking them on my skin when my skintone is a bit lighter. 

The consistency of Illamasqua Cream Blush is really nice. It's very thin and creamy and isn't at all heavy or sticky. It has a bit of a dewy finish, which you may or may not like. I think it looks quite fresh on the cheeks, and not greasy. For less shine, you can set the blush with a light dusting of powder.

The color is very pigmented and blends very easily. I've worn this blush several times and it never looks patchy or un-even on my cheeks. When used lightly with a stippling brush, it looks like cotton candy on my cheeks. It can be layered for a more intense, doll pink effect. 

illamasqua promise cream blush

illamasqua promise swatches

Here's a quick picture of the way it looks on my cheeks. My coloring in the photo is around MAC NC20-25 for reference. It's not the most flattering photo, but it looks really flattering in person. 
illamasqua promise swatch

The lasting power is pretty average for a cream blush. When I'm wearing a more dewy or creamy foundation, it sticks around for six hours or so with little fading. If I'm wearing a matte foundation, it prolongs the wear a couple of hours.

I really like this blush and I'd be interested in trying more colors in the future. I don't have many Illamasqua products, but I haven't been disappointed with any of the products I've tried so far.

Do you own any Illamasqua blushes? Do you have any favorites?

Price: $24, Sephora.

I'm back.

Hey Everyone!

You may have noticed there has been an absence of posts, but I've been out of town, and I just came back last night.

George and I took a trip to Minnesota (more work than vacation) to help my aunt move her things to Chicago. We did manage to go to a few fun places. We went to The Mall of America, which I don't think I ever want to see another mall again, or at least for a while after going there. I use to go to there almost every year when I was young, but haven't been there in about ten years. It was just so exhausting walking around for so long, but we had a nice time.

We stayed at Le Meridien in Downtown Minneapolis and it was probably the most comfortable sleep I've ever had in a hotel. Highly recommended.

We rented a Penske truck to drive my aunt's stuff back home to Chicago. I was a little nervous to be riding in a big truck for so many hours, but it went very well, and was actually a pretty fun trip back home. We stocked up on tons of goodies at several gas stations on the way.. haha!

By the end of the day, I was getting incredibly anxious to be back home. I become really homesick when I'm away - I missed my Mom and Rocky so much! ;)

Anyway, I'll be working on a few reviews and getting back to the e-mails I've missed while I was away!

Talk to you all soon! xoxoxo

Wednesday, March 21, 2012

eBay and CFDA Collab: You Can't Fake Fashion!

eBay and the CFDA (Council of Fashion Designers of America) are currently working together to fight counterfeit goods and celebrate original design within the fashion industry.

Combating the supply and demand for counterfeits and those who manufacture and distribute such items requires the coordinated efforts of the government, the fashion industry, law enforcement, businesses, and Internet users like you. As a major destination for fashion shoppers, eBay is committed to partnering to fight the global trade of counterfeits. (Source)

As of yesterday, March 20th, an exclusive collection of 80 handbags customized by several different designers launched on eBay. All of the designs read "You can't fake fashion". Proceeds from each sale will benefit the CFDA Foundation.

Some of the designers include: Badgley Mischka, BCBGMaxazria, Betsey Johnson, David Yurman, Diane Von Furstenberg, Kate Spade, Kenneth Cole, Narcisco Rodriguez, Nicole Miller and more.

Every one of the designer bags are already sold out, but three of the four non-designer bags are still available. I can't find any information if the bags will be re-stocked or not, but if anyone knows, please let me know in the comments!

The sale will run to March 31st.

CFDA Duffle Tote - $45 (I'm thinking about snagging this one!)

CFDA Tote by BCBGMAXAZRIA - $200

Tote by Brian Wolk&Claude Morais of RUFFIAN - $200

CFDA Tote by Doo.Ri - $200

CFDA Tote by Kenneth Cole - $200

CFDA Tote by Peter Som - $200

View all styles here.

Cute aren't they?

You can read more at eBay's Fashion Vault.

Tuesday, March 20, 2012

A few products that I've been using a lot of lately.

It seems summer has come early this year and even though I'm definitely not prepared, at least my makeup bag is!

When it's hot out, I like to keep my makeup a little more minimal for the daytime. A good foundation with SPF, a light bronzer for a sunkissed glow, an illuminator to make your cheekbones glisten in the sun, a natural pink/coral blush and a little bit of mascara and lip gloss.


Shiseido Sun Protection Foundation - I've been curious about this foundation for years. I remember checking it out a couple years back and I wasn't able to find a good color match for my tan skintone. After seeing Fleur's recent YouTube video, it reminded me how much I've wanted to try it, and the fact that since I hardly ever tan anymore, I'd be able to find a good color match.

I did find a good color match and I've been using it for about a week now. I'm still not ready to give my full thoughts about it yet - all I can say is that I expected to like it a little more than I do at this moment. I am enjoying the high SPF and the lightweight feel, especially since I've been exfoliating on the regular and it's been so hot out! My full review will come soon!

MAC Prolongwear Concealer - Medium coverage with all day, no-budge lasting power. I love wearing it alone or mixed with other concealers.

Chanel Poudre Universelle Compact - I've been using this to set my makeup, and I've been really liking it. I really don't like a matte finish, but I still like to lightly set my makeup to avoid any excess shine. This powder doesn't leave my face looking like a powderpuff, and it doesn't flatten the look of my liquid foundation. It leaves a very nice natural finish, while erasing any shine.

Chanel Soleil Tan De Chanel/Bronze Universel - I think it's safe to say that if I had to toss all of my bronzers and only keep one, I'd keep my Chanel Bronze Universel. I never thought I'd hit pan, but after three years, I finally did and I'm becoming so anxious to purchase another! I'm so surprised that it's never dried up, and still has it's original smell. It's definitely a good investment. On days where I'm not using this, I'm using Becca Flamenco. They're both light but buildable, and look very natural on my light-medium skin.

Stila Convertible Color in Gerbera - How come no one ever talks about these? I've never tried any of these prior, but I thought Gerbera would be the perfect shade of blush for the summer. All of the pinky-coral blushes I own look alike once applied to my cheeks, but this one really stands out from the rest. It's a light, warm peachy-pink that looks incredibly fresh and natural on the cheeks.

Dior Shimmer Powder in Amber Diamond - I own a ton of highlighters, but Amber Diamond is usually my highlighter of choice because of how natural it looks on the cheeks. It gives just the right amount of sheen without being overdone. I've also been using TheBalm Mary-Lou Manizer on days where I want something a little more noticeable.

Covergirl Lash Blast Mascara - An old favorite. I know that when I'm wearing lash blast, I'll never have to check the mirror throughout the day for smudges. It stays put all day with no transfer - even through heat and sweat.

NYX Megashine Lipgloss in Nude Peach - Although I'm not really keen on the cherry cough syrup scent of these lipglosses, they sure have some great colors. Nude Peach is a glossy coral-pink that looks great alone or paired with any coral or pink lipstick.

What products have you been finding yourself using a lot of lately? Is your makeup bag starting to look summery?

Monday, March 19, 2012

Earth Science Deep Conditioning Masque Review!

 Earth Science Deep Conditioning Masque

I'm no hair expert, but I love trying new hair products in hopes of being able to better manage my mane. I have very thick, fine, curly, dry hair. Oddly, I have a mixture of two different types of curls throughout my hair - some are wavy and then underneath my hair, they're a bit tighter. So basically, tangles galore.

I've tried several leave in conditioners in my days, but I have never really been impressed with any of them. I suppose I've held my expectations a little too high, and most of the time expect the leave-in to act as a little genie and transform my fried hair into hair that's fit enough for a Pantene commercial.

After trying so many, I settled on using Aussie 3 Minute Miracle Deep Conditioner on a daily basis. It's cheap, and it keeps my hair soft and more manageable.

For the past couple of months, I've been using Earth Science Deep Conditioning Masque and I really like it!

PRODUCT DESCRIPTION: Luscious deep-conditioning masque repairs dry, damaged, colored or over processed hair. Penetrates and coats the hair shaft in natural silk protein to strengthen and nourish inside and out. Leaves hair soft, tangle free and smooth; not sticky or weighed down. no animal testing, always paraben free.

The directions are to squeeze out any excess water from your hair after shampooing, and generously apply the conditioner to your hair, letting it penetrate you hair for five minutes. Then rinse, and style as usual.

For the best results, you really have to follow the directions. I often take quick showers, and leave it in for about a minute in dripping wet hair and it just doesn't work the same.

Make sure to squeeze out excess water from your hair and then apply a good amount of product in your hair, working it through your ends. **To evenly distribute the conditioner through your hair, it's a good idea to have a wide tooth comb on hand and brush through your hair and work the conditioner through all of your hair. Often times with conditioner, you'll end up holding all of your hair together in a pony tail and distributing the conditioner to the outside of your hair, missing most of the hair that's in-between.

READ MORE!


The consistency is a thick cream, that doesn't turn watery once it hits your hair. It reminds me a bit of the conditioners that often come in boxed hair dyes. It smells extra fresh and isn't at all overpowering.


Wait five minutes. If you can wait even longer, it's worth the wait! Shave your legs, brush your teeth, cut your nails, exfoliate - do whatever you've gotta do to pass a little time. Now, rinse with cool water to close your hairs cuticles and to promote healthy shine.

Let me tell you, my hair feels like silk. Cliche I know, but it feels amazing. I actually use it a couple days out of the week - every week, and it doesn't weigh my hair down or cause any build-up.

What I love the most is how much more manageable my hair is when I use it. I never have tangles, and my hair doesn't feel dry when I'm blowdrying. I also notice less breakage and my flat iron and/or curling iron glides through my hair much easier. It leaves my hair feeling light and fresh. The only downside is because it leaves my hair so soft, sometimes my curls don't hold as well by the end of the night. I think that happens with many leave in conditioners.

I'm overall really happy with this product and will most likely re-purchase.

You can find Earth Science products at your local Whole Foods or from various online retailers. Visit the Earth Science website for a list of locations.

Ingredients: Water, Cetearyl Alcohol, Behentrimonium Chloride, Amodimethicone, Trideceth 12, Cetrimonium Chloride, Panthenol, Persea Gratissima (Avocado) Oil, Cocos Nucifera (Coconut) Oil, Olea Europaea (Olive) Fruit Oil, Hydrolyzed Silk Protein, Ethylhexl Glycerin, Cetyl Esters, Citric Acid, Disodium EDTA, Potassium Sorbate, Phenoxyethanol, Fragrance.

What are some of your favorite leave-in conditioners?

Sunday, March 18, 2012

L'Oreal Cherubic Magicsmooth Souffle Blush Review, Photos and Swatches!

L'Oreal Magicsmooth Souffle Blush in Cherubic

At the start of 2011, L'Oreal launched their Magicsmooth Souffle Makeup, a whipped, airy mousse foundation promising to create a poreless, and flawless finish. It took a year for L'Oreal to add a few blushes to the line, launching the L'Oreal Magicsmooth Souffle Blush at the start of this year. 

There are four (4) shades in total: Celestial (pale pink), Cherubic (warm rose), Angelic (warm peach-pink) and Plume (dusty plum).


All of the shades are very subtle and won't deliver intense color. If you like very light, neutral shades to add just a hint of color to your cheeks, you may enjoy the color selection.

From the swatches I've seen on other blogs, I took the strongest liking to Cherubic - a natural, dusty rose.

Like the foundation, this blush has the same mousse texture that is suppose to glide on the skin with ease, and diffuse into an ultra-soft, natural finish.

I tried using a stippling brush like I do with most of my cream blushes, and it worked fine, but my favorite brush to use is the Real Techniques Blush Brush. It's a tapered, domed synthetic brush with ultra soft bristles. Just a tiny tap of the product on the tip of the brush, and I'll swirl it into my cheeks for a little bit of color.

I've been wearing it on the days where I don't want my cheek color to overpower my eye makeup (if I'm wearing a lot on my eyes) and on days where I've gone bronzer happy and still need a little color on my cheeks without looking like I'm wearing too much makeup.

L'Oreal Magicsmooth Souffle Blush in Cherubic

I'll admit, I was a little nervous to try this product because the only reviews that I read for this product weren't all that positive. (The Gloss Goss called it a "product fail" and Makeup and Beauty Blog rated the blushes a C+, saying that you'll need almost perfect skin to pull them off.)

Many of the reviews complained about a shimmer, but I didn't find shimmer present in Cherubic. Upon close inspection you may find a tiny sparkle or two, but nothing at all noticeable (which makes me wonder why it's there in the first place).

I didn't care at all that this blush might possibly be too sheer, because I actually like products that you can actually go a little hand-heavy without worrying about looking like a clown. Not to mention you're able to finish the product up faster (which I see as a good thing! I feel accomplished when I finish a product!) I tend to use those products more and shy away from products where you have to use the lightest touch and you'll never end up finishing (like many of my Nars blushes).

To my surprise, it's not at all as sheer as I expected. It actually has pretty good pigmentation and is very buildable with an additional layer. I'm assuming they'd work the best on lighter skintones, as on Karen from Makeup and Beauty Blog (Medium-tan, MAC NC42), Celestial and Angelic looked non-existent on her cheeks. 

With my Real Techniques Blush Brush, it blends so well across my cheeks and doesn't leave a harsh edge. Just a very natural color, with a very natural finish.

MAC Blushbaby and Cubic are a couple of my go-to blush colors, and I think I prefer this blush over both of them. It's a little more natural than Blushbaby and a little more pigmented than Cubic. It also warms up to my skintone better than the other two.

Lastly, it seemed to last well on my cheeks throughout the day. Of course the color is completely gone by bed-time, but it's still present mid-day, which is always a good thing.

L'Oreal Magicsmooth Souffle Blush in Cherubic

Here is the blush blended with my fingers on the back of my hand.

I'm guessing these blushes would work best on those with normal skin. They may possibly have too much slip to them for those with very oily skin and can possibly accentuate dryness for those with dry skin. If you enjoy mousse products in general, and are a fan of Maybelline Dream Matte Blushes, these may be worth a try. I think Cherubic is probably the best shade of the four. 

They are a little expensive, at around $13 each, but if you catch a good sale, it'd be worth a try!

On a side note: I really like the packaging. It's actually what drew me into wanting it in the first place. Isn't that funny? 

Have you tried any of these blushes? What'd ya think?

Thursday, March 15, 2012

Physicians Formula Waikiki Strip Shimmer Stripes Custom Bronzer Review!

Physicians Formula Waikiki Strip Shimmer Stripes Custom Bronzer

Physicians Formula Shimmer Strips Custom Bronzer isn't anything new - In fact, the oldest review on Makeupalley dates back to 2006, so they've been around for a while. You may have seen posts about them here and there as they often considered to be comparable to the much higher-end Bobbi Brown Shimmer Bricks.

The Shimmer Strips Bronzers come in a frosty block with five different strips of color. What's great about them is that they are a multi-use product that can be used as a bronzer, highlighter as well as eyeshadow.

There are six (6) different shimmer stripes to choose from: Sunset Strip/Bronzer, Vegas Strip/Light Bronzer, Riviera Strip/Sand Bronzer, Malibu Strip/Pink Sand Bronzer, Miami Strip/Healthy Glow Bronzer and Waikiki Strip/Peachy Glow Bronzer.

From the selection, I think Waikiki Strip is the prettiest one. It contains a warm peachy-pink, gold, golden-copper bronze, deep bronze and a dark chocolate.

Physicians Formula Waikiki Strip Shimmer Stripes Custom Bronzer

READ MORE!

Although I don't like too much shimmer in my bronzer, with a very light hand, this gives a very pretty sheen to the cheeks. When I'm wearing a pink blush, I love using the top strip with a fan brush as a highlight for my cheekbones. I also like using all of the shades for eyeshadow - especially the bottom two browns. They can also be used with a damp applicator brush/sponge for more intensity.


Here are the strips swatched individually..

And here's what it looks like when you swirl all of the colors together! It's a warm, peachy bronze.

Physicians Formula products tend to be a little more on the pricier side of the drugstore products, but they are high quality products. I typically like to wait for a sale to swing around at CVS - every once in a while they have a sale if you purchase $10 worth of Physician's Formula products, you'll get $7 back at checkout that can be used on your next purchase. I always take advantage of the sale and try something I've been interested in.

Physicians Formula Shimmer Strips Bronzer ranges from $10-$15, and can be found at most drugstores.

Wednesday, March 14, 2012

Essence XXXL Shine Lipgloss in Bubble Babe, Super Girl and Nude Candy.

Essence XXXL Shine Lipgloss

I've purchased Essence's XXXL Shine Lipgloss in the past, and I was pretty impressed. I can't really call it a drugstore brand, because in the USA, it's only available in ULTA, but it's one of my favorite bargain brands for lip products. (*edit - there may be other locations depending on your area. The location finder on the Essence website only shows results for those living in Germany, Switzerland and Austria. I have only seen Essence at ULTA in my area.)

Essence XXXL Shine Lipgloss is available in twelve (12) shades: 01 Pure Chic, 03 Timeless Beauty, 04 Rising Star, 05 Super Girl, 07 Big Night Out, 08 Glamour to Go, 09 Party Connection, 14 Bubble Babe, 15 True Love, 17 Fabulous Fuschia, 18 Sparkling Papaya and 19 Nude Candy.

Super Girl is a very sheer watermelon pink with bright pink shimmer.
Bubble Babe is a very sheer, cool cotton candy pink with cool pink and white shimmer.
Nude Candy is a creamy pale pink, reminiscent of Nars Turkish Delight Lipgloss. The color applies fairly opaque in comparison to the other two shades.

Super Girl and Bubble Babe work best applied over a lipstick to add a little bit of glossy shine, as alone, they don't provide much color.

One of my favorite things about the XXXL Shine Lipgloss, is the brush design. It's not your average sponge or doe-foot applicator. It's longer, and flatter than your standard doe-foot. What's nice about the shape is that the applicator picks up the perfect amount of product, and in one sweep it applies the product evenly across your lips. You'll rarely ever have to double dip.


READ MORE!


I also think the packaging is pretty nice. The tubes remind me a bit of MAC Dazzleglasses/Cremesheen Glass or NYX Round Lipglosses. With inexpensive brands, the packaging is sometimes a sore thumb, but I really like these.


The formula is creamy (no stickiness!), and feels great on the lips. Even with the glittery shades, they don't feel gritty on the lips.

From left to right: Nude Candy, Super Girl and Bubble Babe.

Essence XXXL Shine Lipgloss can be purchased at ULTA for $1.99.

Tuesday, March 13, 2012

Essence #47 Prom Night Lipstick Review!


Essence Prom Night Lipstick

I've pretty much been on an Essence buying rampage lately. I know Essence is nothing new to ULTA, but they're constantly coming out with new products and colors. And, since they're such an affordable brand, you won't be breaking the bank, even with your hands full

Essence Lipstick is available in ten (10) fun colors: #40 Look at Me!, #41 Femme Fatale, #42 Fairytale, #43 Kiss you, #47 Prom Night, #48 Red Carpet, #49 Like a Lady, #50 Creamy Nude, #51 Fifth Avenue and #55 Coralize Me!

Since you can never have enough natural pink lipsticks, I knew that #47 Prom Night would be one of those shades you can throw on your lips daily, and it'll pretty much go with anything. And, at $2, how can you go wrong?

Prom Night is a bubble-gum pink that leans a bit on the cool (slightly purple) side and has a slight frosty finish. I'm not a fan of frost. It makes me think of the 90's when everyone was rocking white, silver and lilac frosty lipsticks (Yeah, I was 11 or 12 years old rocking it too.) This lipstick only has a subtle frost, so don't fear. For those of you that own Rimmel Pink Blush Lipstick, it's pretty similar.

Essence Prom Night Lipstick

READ MORE! (there's a picture of George & Me @ Prom.. haha!)


It's pretty sheer at first, but very buildable. For those of you with pigmented lips and don't want the redness peeking through, you may want to tone them down with a little concealer (or MAC Lip Erase) before applying.

For some reason, when I apply lip balm prior, the lipstick doesn't spread evenly. It actually applies better on dry lips. Due to the frost, it feels slightly gritty on the lips, but I think paired with a similar colored lipgloss over top, it looks great!

Still, not bad for the price!

Do you have any favorite Essence lipsticks?

What was I wearing on Prom Night???
I believe it was MAC Florabundance Lipglass, press-on nails and loads of self-tanner (eek!) I wore a tiara because prom fell on my 18th birthday. I had to keep telling everyone "No, I'm not the prom queen." haha!